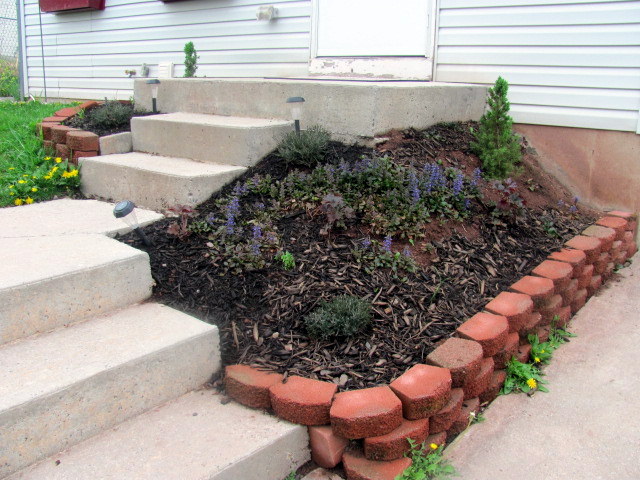
My last house had a serious erosion problem along side the carport but I figured installing a retaining wall would require a professional and a lot of money. When we moved to the new house, the soil was eroding from underneath the front stoop and something had to be done. After the cost of moving, we couldn't afford much so I did some research, got some freebies, and got to work.
You can find many videos on Youtube on how to install a simple, small retaining wall. It's actually amazing how simple it is.
Special, retaining wall bricks are available in different colors and sizes at any garden center for little cost. Look for the bricks with the "lip" that will hang over the side of the brick beneath it. I'm even cheaper than that. When visiting my in laws, I discovered that they had a lot of retaining wall bricks laying around from a project they had torn up and no longer needed. Free bricks for me.
As an aside, one of the beautiful things about gardening is how warm and generous gardeners can be. We share tools, plants, time, and other resources as best we can. I don't mind taking hand outs from others because I'm always willing to reciprocate. If you're serious about gardening on a budget, then you need to be part of community.
Getting back to retaining walls, it's very important that your bricks are level, especially front to back. You must also stagger the bricks. We actually have a neighbor who stacked his bricks in strait stacks and his retaining wall is falling over. The first level takes time to get right but the other levels will be much easier. That is it. Seriously, that's it. I didn't spend a cent on this retaining wall.
Now, if you needed a larger, stronger retaining wall then maybe it's time to call a professional but for this size project, you can definitely handle it.
You can tell from the picture that the garden bed is far from finished. I didn't want to pile up too much loose dirt at once to have it wash away. I bought a dwarf Alberta Spruce because I know from my last home that their roots will help prevent further erosion. A friend of mine has a few flower beds completely over grown with red coral bells so she had no problem with me taking a few. The purple bugle weed came with the house. Come Spring, this bed will be beautiful with more plants, more soil and mulch. Stay tuned!