Showing posts with label DIY. Show all posts

Sunday, May 31, 2020

Reclaiming an Overrun Garden Bed

Before
We've all done it. Life gets busy and before you know it, it's June and one (or more) of your garden beds is completely overrun by weeds and who knows what else. No worries! I'm here to walk you through how to reclaim your garden area.

Step 1: Determine what you want to save. We kept the two azalea bushes, despite their sickly appearance and transplanted some daffodils and bleeding hearts to another spot.

Step 2: Rip out everything you don't want. In this case, we tore out lots of weeds, dead leaves, rotted logs and two snakes. (They were tiny, no problem!) Of course, when pulling out weeds, get as much of the roots as possible.

Step 3: Be sure to outline your bed the way you want. We just used spades and, at the end, a string of rocks from the woods. However, you could also use any number of different edging from your local hardware store.

Step 4: Add any plants you want. We were going for a Japanese inspired look so in addition to the Azaleas, we also added small hostas. (Azaleas and hostas are from Japan)

Step 5: Baby any of the plants that are original to the bed. If the plants have been over run with weeds and forgotten, odds are they are going to need a little TLC. I pruned the Azaleas, fed them with an organic fertilizer and treated the plant with a fungicide. (If you interested, it's called Green Cure and you can order it here.)

Step:6: Lay down cardboard between plants. This will repress the weeds. You will thank yourself later.
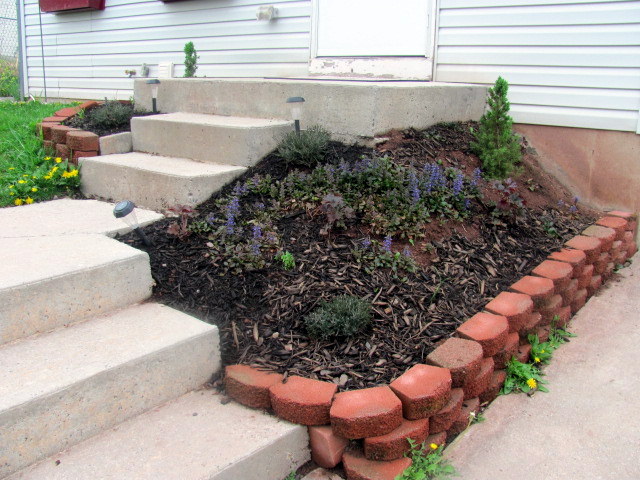
After
Step 7: Mulch over the cardboard. In this case, because we are going for a Japanese look, we used rocks but you can also use wood chips.

Step 8: Water if needed. Be sure any new plants don't dry out.

That's it. I did the pictured garden bed in one afternoon with some help. Don't give up on a garden because it's over grown. The feeling of accomplishment is so worth the effort of cleaning it up. You can do it! If you'd like more information on Japanese gardens, then check out the links below.

The Elements of the Japanese Garden

9 Traditional Japanese Plants

Monday, January 29, 2018

The Basics of Winter Sowing

This topic is rather exciting for me because I think it will be so useful for many of my friends. Most of the people I hang out with don't have a lot of time and energy to put into gardening, enjoy doing projects with their kids, and would like to save a few bucks. Winter sowing, in theory at least, can accomplish all three of these things.

Having somewhat limited space with a baby, a cat, and a toddler (I have a husband too but he would leave my plants alone) makes seed starting an impossibility. Also, the cost of special lights, trays, soil, warming pads and any other equipment makes seed starting way more costly than just buying plants at the nursery in the spring. However, if you can do direct seeding outside then it's much cheaper than buying plants. Winter sowing is a way to put these methods together.

Here are the basic steps.
1. Get a few plastic jugs such as milk cartons and cut three sides of the container so you can "hinge" it open at 3-4 inches from the bottom. You MUST put holes in the bottom for drainage. Otherwise your seeds are toast.

2. Fill the bottom 3 inches or so with soil. I used Miracle Grow Seed Starting Potting Soil because that's what I had on hand. You can use any decent potting soil. (One website I read suggested peeing on dirt to add nitrogen. You can try that and let me know how it goes.)

3. Thoroughly water the soil and let it drain a bit. Then plant 3-6 seeds in the soil and be sure they are covered.

4. Duct tape the container back together and leave the cap off for ventilation.


5. Set the containers outside in the sun. Don't heat them or protect them. Do this soon, after February it will be too late.

6. Forget about them! Let nature take it's course till the plant is big enough in the spring to be transplanted.

Pretty easy huh? Winter sowing is also a great project to do with your kids. If it works well this year, then this will definitely become part of my new gardening routine. Have you tried winter sowing? Please post about it in the comments below!

Sunday, June 18, 2017

Pennsylvania Pickled Beets and Eggs

One thing you won't ever see on this blog are a bunch of recipes. However, when it comes to traditional ways to use your garden produce, I'm all in. I grew up with pickled beets in Michigan but the egg part I picked up since moving to Pennsylvania. With a little bit of thought I was able to use my great grandmother's pickling recipe and add the hard boiled eggs at the end. Here is how you too can make pickled eggs and beets.


First off, this blog is about gardening and right now is a great time to be harvesting beets in central PA. My family has always used Detroit Dark Red Beets but I'm sure you could substitute the beets of your choice. Pick enough beets to fill a regular sized stock pot, scrub them down and cut off the root tips and greens (please don't throw your greens away, they are delicious!).

Second, boil the beets till the skins are loose, about an hour. Strain the beets and let them cool before removing their skins.

Third, cut the beets to uniform size before returning them to the pot. Don't get too fussy about it.

Fourth, add 2 1/2 cups sugar, 1 cup apple cider vinegar and 3 cups of water and mix it all up. Boil for another hour or until the beets are the consistency you want.

Fifth, hard boil 12 eggs and peel off the shells.

Finally, take a 2 quart jar and take turns adding beets and eggs then poor the pickling juice over it all.

Refrigerate for at least 24 hour and enjoy!

Wednesday, April 26, 2017

An Update on Projects from Around the Homstead

Spring has brought on a lot of little projects here and has certainly spiffed up what were some real eye sores around the yard. Everyone loves some before and after pictures so here are a few for you. Keep in mind, with me projects are never completely done, they just improve slowly over time.

Our mailbox was such a problem. A rotted, hollow post falling into the street. We gave it a much better replacement.

Before

After

The front flower beds where an erroding mess of weeds when we first moved in. That spot has taken some serious work but it's getting better all the time. You can find more info on how to build the retaining wall here. 
Before

After

Finally, this past weekend I FINALLY got my perennial herb garden installed. Mostly. Still looking for a few plants but I got a lot of good ones including English thyme, rosemary, sage, and oregano. In the after picture you'll notice it looks a bit empty but these perennial plants will grow to fill in the space. It's important to not crowd your plants. Decorative rocks can visually fill the space till the plants do so. You can learn more about growing herbs here.

Before

After
 So there's an update from our yard. What projects have you been up to? Feel free to post in the comments below.

Wednesday, February 8, 2017

Save Loads of Cash on your Salads

So, in my initial post on saving money, my first suggestion was to grow loose leaf lettuce. Why? Because organic lettuce can cost you $9 a pound easily and if you don't eat it all quickly enough then you'll be throwing some of it out. Any beginner gardener can grow their own lettuce from seeds and pick the leaves as needed so there isn't any waste. I've grown all the lettuce my family needs for six months one year from a $3 pack of seeds. Here's a few things to keep in mind.

First, you'll need to prepare your garden or container (did I mention you can grow lettuce in containers on a deck or patio?). Lettuce isn't too picky so just be sure your soil is decent and loosened up. You don't need to buy plants at the garden center, lettuce is super easy to grow from seeds. I recommend buying a packet of seeds with a mix of different kinds of loose leaf lettuce. Loose leaf means that it doesn't grow into a head like iceberg lettuce does. This is a good thing because with head lettuce, you just pick it once and it's done. With loose leaf lettuce you can cut off leaves as you need them. My favorite is the Rocky Mountain Mix from Baker Creek Heirloom Seeds but you can find seed mixes at any garden center.

Second, lettuce is a cool weather plant. It doesn't like to be hot. Here in central PA, I can directly plant lettuce seeds into the ground on Saint Patrick's Day as long as I plant them in a raised bed with lots of direct sunlight. That's right, mid-March; a full two months before the frost-free date. I can start harvesting lettuce by the end of April through the end of June. Then, I plant more in August so I can harvest it from Sept through November. Just plant a bit more every few weeks and realize that you probably won't get any in July and August due to the heat.

Third, when planting, just scatter the seeds on top of the soil or give it a light covering. Then keep the soil moist till the plants are established.

Finally, I mentioned above that I recommend getting a seed mix. Certain varieties of loose leaf lettuce can taste rather bitter on their own, such as escarole or arugula. If you get a mix, then you'll get a nice variety of flavors.

Have any of you grown lettuce before? Please comment about it in the section below!

Wednesday, February 1, 2017

The 3 Best Ways to Save Money Gardening

So, lots of people get into gardening to save money on groceries only to find out you can spend LOADS more money growing your own food. Now, there are lots of great reasons to get into gardening besides saving money: exercise, fresh air, therapy, quality time with family, organic fresh food, etc. However, most of us need to pay attention to our budget. So, if you're thinking about getting into gardening, here are the three things you should start with. I'll give you an over view here and then go more in depth in future posts.

First: Loose leaf lettuce. Organic lettuce can easily cost $9 a pound at the store. You can grow your own loose leaf lettuce from seeds. I've grown all the lettuce we needed for six months of the year from a $3 seed packet. Here in central PA, you can direct sow lettuce seeds into soil at St Patrick's Day and enjoy it into late June when it will get too hot. Then, start planting again in August and enjoy your lettuce till almost Thanksgiving. Lettuce likes cool weather. Sow more seeds every two weeks to enjoy a continual harvest.

I also love it because there is much less waste. Haven't we all thrown out old lettuce? If you grow head lettuce (like iceberg or romaine) then you harvest the head once and you're done. With loose leaf lettuce you can just go out and clip what you need for the next day or two and none is wasted. Just don't harvest more than 50% of the leaves off of any particular plant at one time.
Image is of part of the herb garden at Mt. Vernon. George Washington knew what he was doing. 


Second: Fresh Herbs. Cooking with fresh herbs is so delicious but having to buy them at the store can really add up. Start by developing your perennial herb garden. Perennial means they will come back every year. In Pennsylvania, you definitely need to include Chives, Oregano, Thyme, and Sage. Plant them in a hot sunny, well drained area and enjoy for years to come. After that, try growing herbs from seed like Basil, Dill and Parsley. Your cooking will be fabulous!

Third: Raspberries. All berries are really delicious, really good for you, and really expensive. Even pick your own berries in season are pricey. What to do? Grow your own. Now, growing any berries will save you money but in my experience raspberries are the easiest. I just spent $12 for three bare root plants and I will harvest tons of berries for many years to come. This also goes for black berries or any other kind of "bramble". I've had great success with "Heritage" raspberries.

How about you? How have you saved money on groceries by gardening? I'd love to hear about it in the comments below.

Monday, November 21, 2016

How To Create The Perfect Evergreen Decorations Part 1

 Even after years of retail work, and seeing all of the materialism and consumerism it can entail, I still love the holidays. Singing carols, giving gifts, baking and so much more make December just fabulous. Every year, I also just love decorating, especially with fresh evergreens. The pictures in this post are from our old home last year.

1. Pine Roping is a favorite for me. It's classic, beautiful and very affordable. If you're made of money, you can go with cedar roping but I think the pine looks great and costs much less.


2. Containers can be so beautiful filled with a mix of fresh evergreens, red berries, and pine cones. Most gardeners have containers lying around unused in the winter. Put them to good use!


3. Who can resist a beautiful wreath? It's not hard to make your own with a wire frame and a good mix of greens, pine cones and a pretty bow. Check out youtube for some great how to videos on making your own wreath.


4. Of course, you've gotta have  a great, fresh tree. Our old house was so small, we could only get a small tree. I think it was really cute with pretty ribbon, lights and a very eclectic mix of ornaments that really represent our family. I can't wait to get a large, full size tree for our new living room!


5. When you think about decorating with fresh evergreens, maybe the first thing you think of is a beautiful centerpiece. I'm not going to lie, these are difficult to make yourself. As someone who not only has made hundreds of them, but has tried to teach others how to make them, I know. However, you can find them at any local florist and some grocery stores.


That's a look back at last year. After I get the new place decorated, I'll be sure to post pictures of that as well. Hopefully, this post will get you excited and inspired to make your own home beautiful and festive this holiday season.

Tuesday, November 8, 2016

Three Principles For Frugal Homesteading

Simple, country living holds a lot of appeal. Who doesn't want peace and quiet, open space, and simplicity? However, if you're watching HGTV, it might seem that buying a home in the country and getting established is going to cost a pretty penny. Don't be discouraged! In many ways, living in the country is cheaper than the city: no HOA's, lower cost of living, fewer taxes, etc. If you're already enjoying the good life (in the country) or just thinking about it, here are three principles you need to embrace to afford the life style you want.

Patience: When it comes to gardening, I always say you can be patient or you can be rich. For instance, when I bought a few bushes recently, I could get the small size for $9 each or the next size up which were $45 each. Guess what? We're going to have to be patient while waiting for the bushes to grow. Seeds are cheaper than plants. Fruit trees take time to grow and bear fruit. We're not rich, so we have to be patient. Frankly, my favorite gardens are the ones built and developed over time anyways, not the squeaky clean ones that got installed professionally in a weeks time. Embrace patience.

Community: I touched on this in a recent post. Wealthy people can afford to hire professionals to do their work. They can also buy anything new when they want it. Not so much with us. We needed help moving and painting. Friends and family and lent us tools, shared plants with us and gave us materials they had but didn't need. When needed, we're happy to help them out in return. In time, I look forward to dividing perennials with others and being able to share from our homestead. In order to afford a rural lifestyle, you really need to be part of a community.

DIY: We can't always just afford to go buy what we want or need so we've embraced a spirit of Do It Yourself. If we can build it, paint it or create it ourselves, then we do. It is so much cheaper. Aside from the savings, it also gives our home more meaning and uniqueness. If you don't have a particular skill, then maybe you can get someone to help you in exchange for helping them out. My mother in law has made beautiful curtains for our home which is great since sewing isn't my thing (yet). In return, I've helped her out in the garden. Learning how to do things yourself is a huge part of homesteading.

What are some philosophies or principles you embrace to enjoy living in the country? I'd love to hear about it in the comments section below.

Friday, November 4, 2016

How To Make A Strong Retaining Wall

My last house had a serious erosion problem along side the carport but I figured installing a retaining wall would require a professional and a lot of money. When we moved to the new house, the soil was eroding from underneath the front stoop and something had to be done. After the cost of moving, we couldn't afford much so I did some research, got some freebies, and got to work.


You can find many videos on Youtube on how to install a simple, small retaining wall. It's actually amazing how simple it is. Special, retaining wall bricks are available in different colors and sizes at any garden center for little cost. Look for the bricks with the "lip" that will hang over the side of the brick beneath it. I'm even cheaper than that. When visiting my in laws, I discovered that they had a lot of retaining wall bricks laying around from a project they had torn up and no longer needed. Free bricks for me.

As an aside, one of the beautiful things about gardening is how warm and generous gardeners can be. We share tools, plants, time, and other resources as best we can. I don't mind taking hand outs from others because I'm always willing to reciprocate. If you're serious about gardening on a budget, then you need to be part of community.

Getting back to retaining walls, it's very important that your bricks are level, especially front to back. You must also stagger the bricks. We actually have a neighbor who stacked his bricks in strait stacks and his retaining wall is falling over. The first level takes time to get right but the other levels will be much easier. That is it. Seriously, that's it. I didn't spend a cent on this retaining wall. Now, if you needed a larger, stronger retaining wall then maybe it's time to call a professional but for this size project, you can definitely handle it.


You can tell from the picture that the garden bed is far from finished. I didn't want to pile up too much loose dirt at once to have it wash away. I bought a dwarf Alberta Spruce because I know from my last home that their roots will help prevent further erosion. A friend of mine has a few flower beds completely over grown with red coral bells so she had no problem with me taking a few.  The purple bugle weed came with the house. Come Spring, this bed will be beautiful with more plants, more soil and mulch. Stay tuned!

Tuesday, November 1, 2016

Create a Garden Bed Without Power Tools in 5 Easy Steps

My new house came with a quarter acre sized yard which had only two flower beds, one of which had a serious erosion problem (more on that in a later post). What's a gardener to do? Start putting in garden beds, of course. I needed to get my garlic planted in October so that's where I began. However, I don't have much of anything in the way of power tools and after buying a house and moving I don't have money to burn. Here is how to put in a new garden bed with minimal tools on the cheap.

First, choose your location. If you're growing edibles, then you're going to need a sunny spot. Most plants also need good drainage. Of course, if you want to spruce up a shady, wet area of your yard, go for it. Just know that you'll have to be very careful in your plant selection.

Second, measure out where you want the bed. Don't make it more than two feet deep unless you can get all the way around, then you can make it four feet deep. Any bigger, then you'll not be able to reach in to pull weeds or get at your plants.

Third, remove the sod. What a pain. By far, this is the hard part. Using a round pointed shovel, lift up and remove the carpet of grass. Hey, at least you're getting  a  good work out.

Fourth, install a weed barrier. If you don't do this step, you will regret it later. Grass grows like a living carpet and you've got to block the roots from spreading into your new bed. Now, if you're cheap, broke or hard-core environmentally friendly, you can use cardboard cut into 6 inch strips. I've done it. However, it will rot eventually and the grass will grow in. Consequently, I use black plastic edging because it's inexpensive and permanent. It's not particularly attractive but I figure I can add bricks on top of it eventually and build up the soil more. This will do for now.


Fifth, fix the soil in the bed. You'll probably need to take a hoe to break up the soil underneath the sod. Since you removed the sod, you'll also need to add to the quantity of the soil. Depending on what you want to grow and what your soil was like to begin with,  this is the best time to improve the quality of the soil as well. You can add compost, manure, or fertilizer.

Now you're ready to put in your plants!


On the other hand...

If you plan ahead in the fall, you can put in a garden bed by installing the plastic edging and then covering the sod with cardboard and grass clippings. Over the winter, all the grass and weeds will die and in the Spring you can put your new plants in. This is where I want to plant my raspberries in the spring.