Showing posts with label seeds. Show all posts

Friday, April 22, 2022

Identifying Vegetable Seedlings

 It's Spring! You've planted out some vegetable seeds and are anxiously awaiting their appearance. Some little plants emerge but are they your vegetables or perhaps weeds? Maybe you planted something but can't remember what. In either case, I thought some pictures might be helpful. Here are several pictures of vegetable seedlings from my garden with descriptions so you can know what you're looking at in your own beds. 

Carrot seedlings always have long, thin leaves.

Lettuce seedlings in desperate need of thinning. 

Turnips

Onion seedlings. I'm growing them  to eat as green onions. 

Beets. Note the red stems. 

Kale

Spinach has long, thin leaves like carrots but a little thicker. 

Peas

Radishes. Note how their first two leaves are shaped like kidney beans. 


Thursday, February 24, 2022

How To Grow Onions and Radishes

 To be frank, onions and radishes have nothing in common besides being edible, growing under the ground and enjoying cool weather. However, they are the last two Spring vegetables I'm writing about and are easy enough I didn't feel they needed separate posts. If you enjoy radishes and onions then rejoice! because they are both relatively easy to grow. 

Radishes are a great veggie for beginners. You can buy seeds for cheap, toss them on some soft soil and water. In 4-5 weeks, you'll have radishes to eat. Honestly, the only down side is that a lot of people don't like them. I enjoy them grated up in a salad so I'll grow a few but not too many. They are great succession crops, you can just toss out a few more seeds every few weeks and have a steady supply of radishes all spring and again in the fall. Here in York County, I'll start planting them towards the end of March and again in Mid August. 

Onions are a little more tricky. Growing onions from seeds takes a LONG time. You have to be willing to start them indoors and now that it's the end of February, it's really too late for that. I always buy onion sets. These are little baby onions that you can plant out in mid March and let them grow up. Onion sets have the advantage of being dirt cheap. You can find them at any garden center or hardware store. White and purple onions are best for fresh eating. I always get yellow onion sets because they are the best for storage. 

Plant onions out as soon as the ground is workable. I plant mine around St. Patricks Day. Onions NEED full sun. If you skimp on the sunlight, you will get small onions. Seriously, give them at least 8 hours of sunlight. They also need rich, well drained soil. I will sprinkle some general purpose fertilizer over the ground after I've planted the sets. Later around Memorial Day, I give them another feeding. When the tops start falling over, it's a sign the onions are ready to harvest. For me, that's usually around the 4th of July. (Yes, it's typical for gardeners to do things around holidays. ) If you leave them in the ground for too long they will start to rot. 

If you grow a lot of onions and want to store them, you'll need to cure them. You can read about that here. 

The only pest I've ever had for radishes are rabbits. They can be easily deterred by chicken wire fencing. I've never had any pests on onions. The biggest problem I have with those is root rot from too much rain. 

You can totally grow your own radishes and onions. Do you have any favorite tips? Be sure to write about them below. 

Saturday, January 22, 2022

Grow Your Own Carrots

 Carrots are a very popular vegetable. Most people eat them in one form or another and it's one vegetable even kids are willing to eat. My kid being a  big exception. Anyways, carrots are delicious raw, steamed, boiled or roasted. Even better, you can grow your own carrots twice a year! 

First off, carrots are cool weather vegetables so they grow best in the Spring and Fall. Hence, you can grow them twice a year. 

Secondly, carrots MUST be grown from see
d. You can't transplant a carrot because the root (the edible part) will be all messed up.
You can find carrot seeds just about anywhere in the spring but not in the fall so be sure to buy enough for both seasons. Spring is good for smaller sized carrots (fingerling, parisienne, danvers half long, etc) and fall is better for full sized carrots because they'll have longer to grow. 

Third, when you plant them, be sure to break up the soil well and remove all rocks. Then scatter the seed carefully and cover with a thin layer of soil. Remember, they can't be transplanted and they will HAVE to be thinned so don't over seed them. Keeping the soil damp in the Spring shouldn't be a problem but it will be difficult in the fall. In York county, PA where I live, fall carrots should be planted the end of July so getting the seeds started and keeping them damp is a challenge. 

Fourth, carrots are notorious for taking a long time to germinate. Give them at least 2 weeks before giving up on them. Honestly though, I've never had trouble getting carrots to germinate in spring or fall. You just need to be patient. 

Fifth, when the seedlings are around 2-4 inches tall you HAVE to thin them. Each carrot needs at least 1 inch of personal space or the roots can't fill out. 

Sixth, not only is hot summer weather not good for carrots to grow in, it also brings bugs. I always pull all my carrots out by the end of June no matter what because if I leave anything in the ground, the bugs will chew it up. I've not had that problem in the fall and can leave the carrots in the ground until January if I wish. 

And that, my friends is all there is to it. I've never had to treat any pests or diseases on carrots in my garden, just so long as I don't leave them in all summer. Also, fun fact,  carrot leaves make nice greenery in cut flower arrangements. So try growing your own carrots! You can totally do it. Feel free to comment about your experiments with carrots in the comment section below. 

Tuesday, January 11, 2022

Kale is Awesome and You Should Grow It

 As you might infer from the title, this article is a bit opinionated. However, it is full of information that you should consider before writing Kale off forever. You should grow it! First, Kale is super healthy

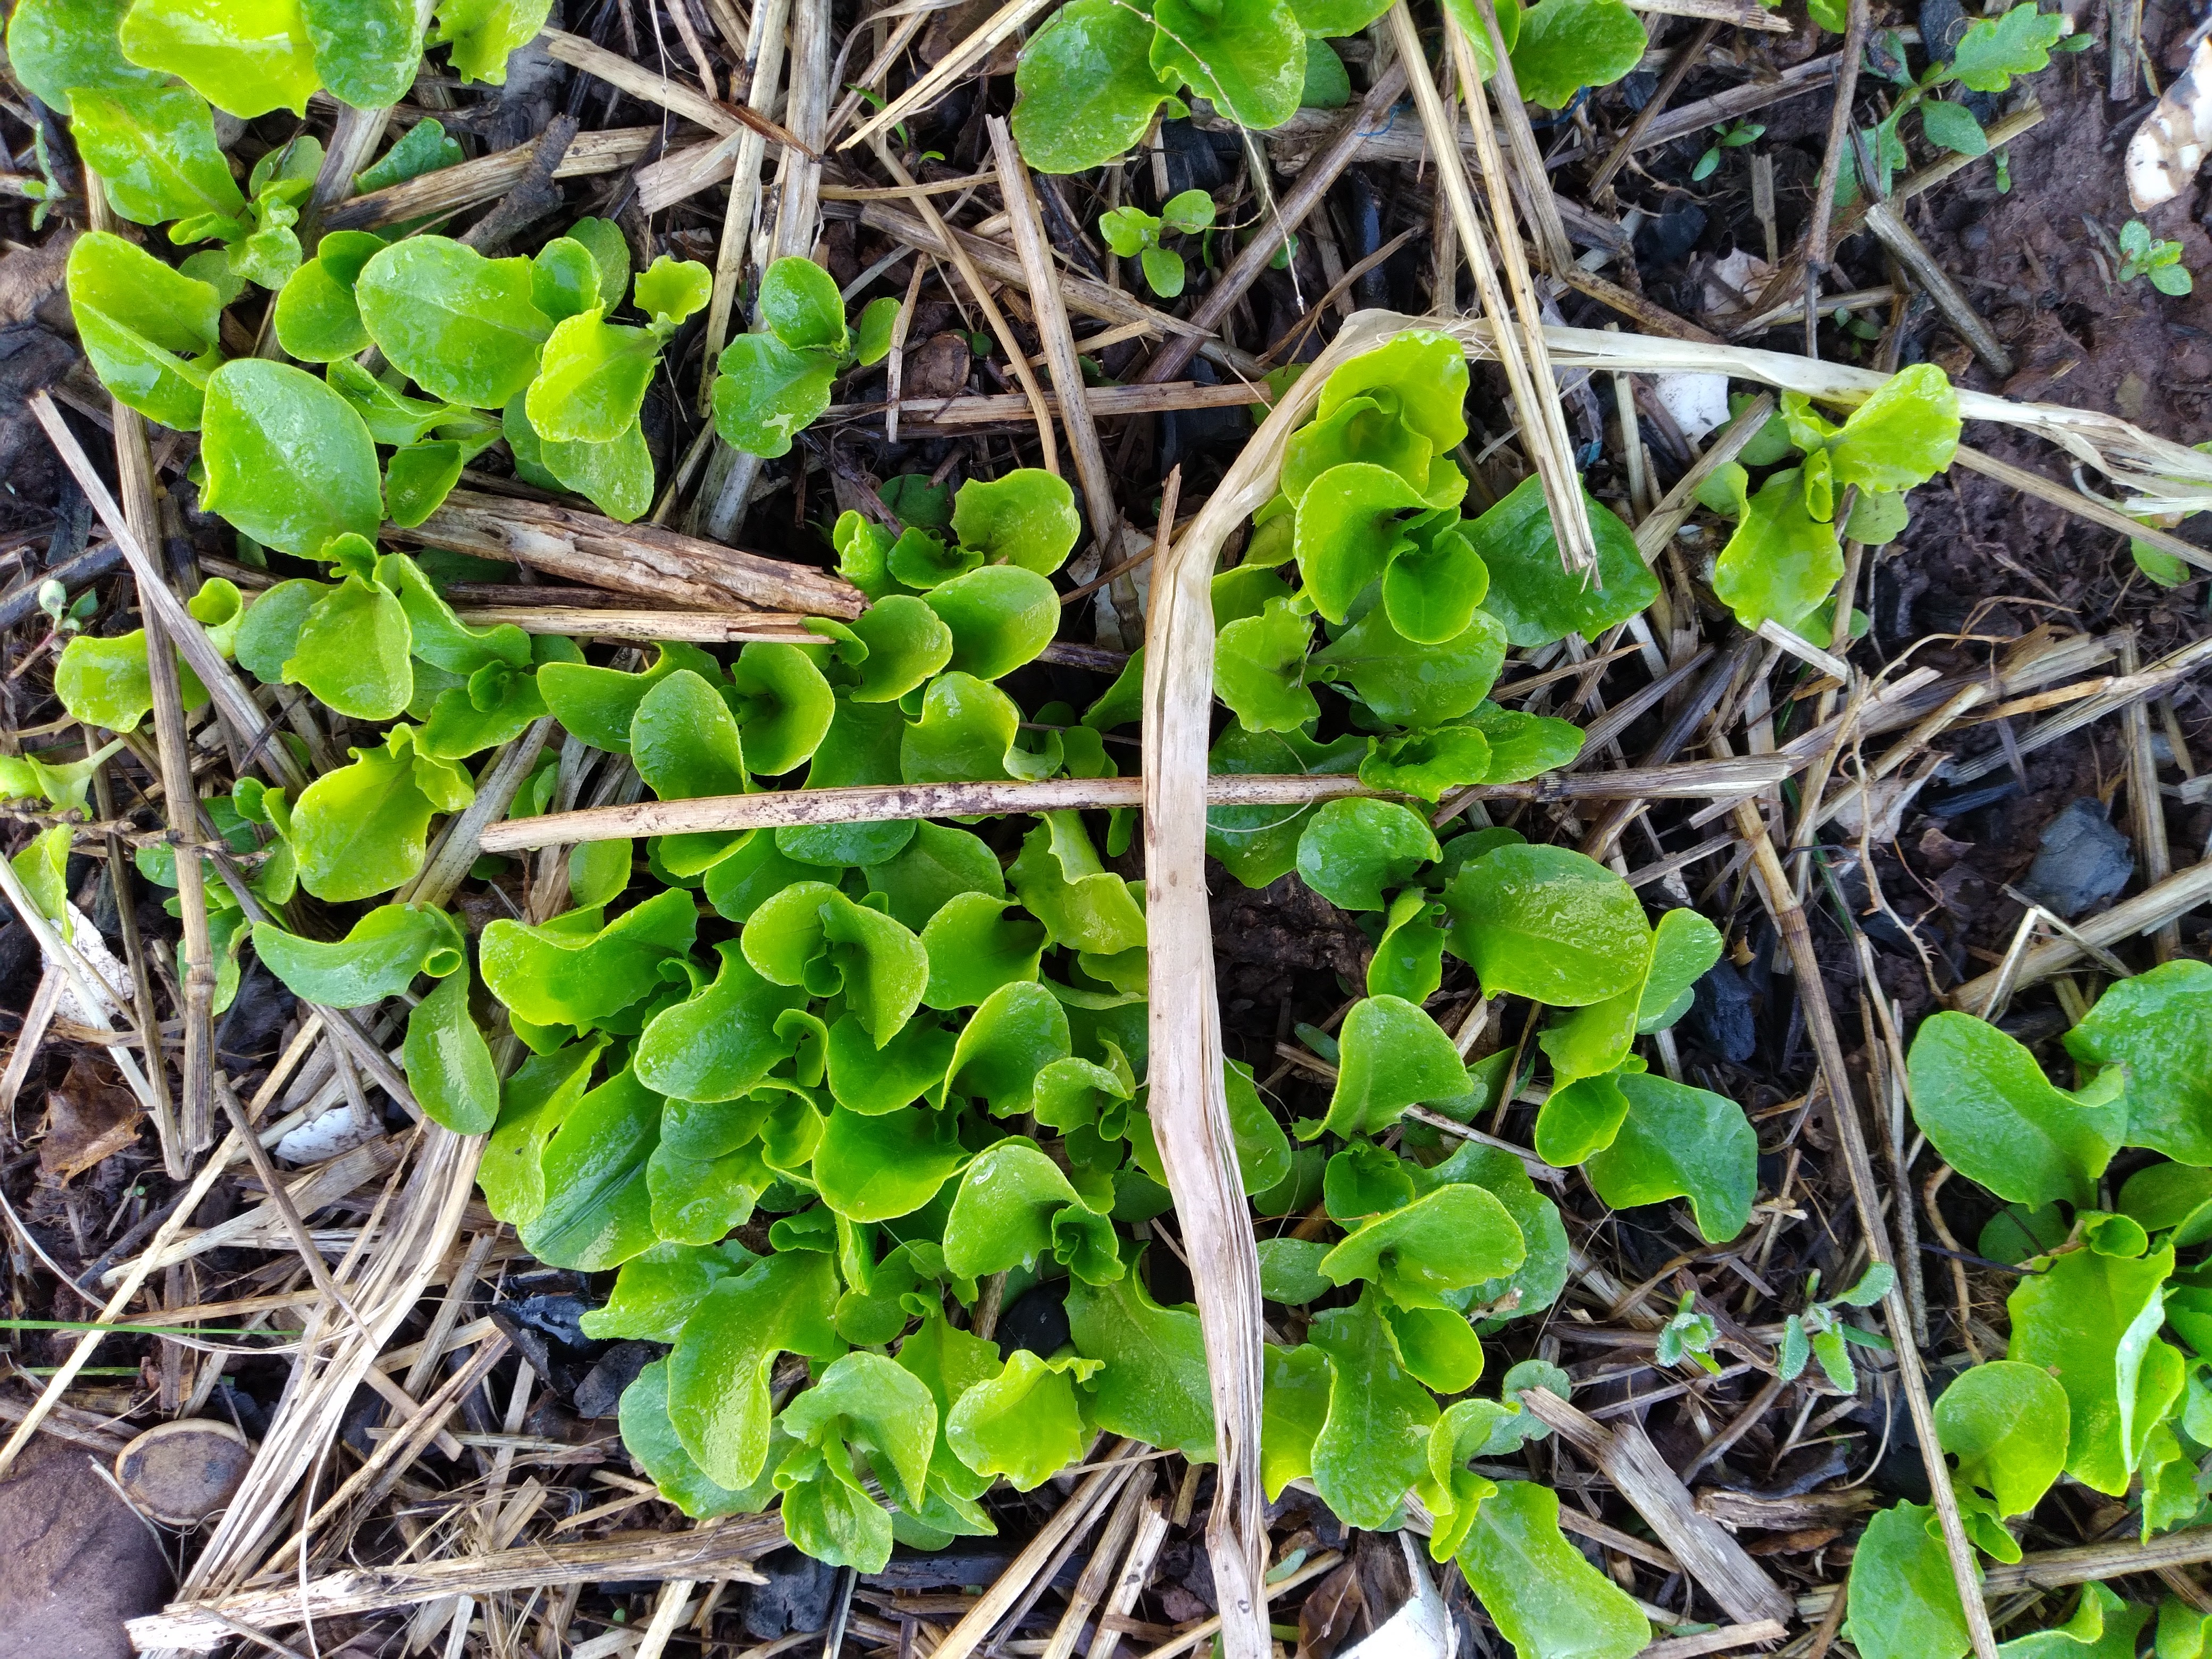
Red Russian Kale, which isn't my favorite but 
there were extenuating circumstances. 

food. Second, Kale is delicious. Third, it is really easy to grow from seeds so it will save you on your grocery bill! 

So, the first point is universally acknowledged, Kale is super good for you. For more info on that, click here

If you think kale tastes bad, then you should try it the following three ways which I think are amazing before giving up on it. 

1. You can make kale chips by taking the stems off, spreading on a cookie sheet, sprinkling with olive oil and salt, and baking at 350 degrees for 12 minutes. That's it. So crunchy and delicious. Curly kale is best for this but that's usually what you find in the grocery store anyways. 

2. You can add it to several kinds of soup and soften it a bit. We love it in zuppa toscana. Recipe here. 

3. It makes a great salad. I love it with feta cheese, apple slices, raisins and a balsamic vinaigrette. Yum! Recipe here

Now are you convinced you should grow some? Fantastic because it's so easy. 

First, kale is a cool weather crop. Here in York County PA you can grow it 10 months out of the year. Just not July and August because its too hot. 

Second, it is super easy to grow from seed. Please don't waste your money buying seedlings. You can also find seeds anywhere that sells seeds. I've even seen them at the dollar tree. Always follow the instructions on the package, kale seeds are small and shouldn't be buried more than a quarter inch. 

Third, kale needs average moisture and soil conditions, is not a heavy feeder, but does need some sunlight. Full to partial sun is fine. 

Fourth, kale is a great plant to do succession planting. So, plant out a few seeds in mid March, and then a few more seeds 2 weeks after that and so on till early May. Then start again in early August and keep going. 

Finally, kale is a brassica so it is susceptible to any other pests and diseases that other brassica's might get. In my garden that means cabbage worms.  They are easy to treat though. You can either put a bug net over your plants so the months can't lay their eggs on them, or you can spray them with Bt (an organic biological control easily found at any garden center). 

So that's it, so easy right? Have I convinced you yet? How do you like to eat or grow kale? feel free to comment below. 

Tuesday, January 4, 2022

All About Lettuce

Lettuce is a seriously underappreciated vegetable. I blame the laziness that defers to dull, yellow iceberg lettuce for every salad and sandwich people eat. There are dozens of varieties of lettuce and they are all really good for you! Most are also incredibly easy to grow from seed which can save you lots of money at the store and help you eat healthier. 

If you want to grow something familiar, then Romain Lettuce is a good option but I definitely prefer loose leaf, of cut and come again, lettuce. You can continually harvest leaves off the plant and it will continually grow new ones. Just don't ever harvest more than 50% of the leaves at a time. They also come in colorful seed mixes to brighten up your salads. 

Lettuce is very easy to grow from seed. PLEASE don't waste your money on plants at the garden center. 

Lettuce is a cool weather plant. It is easiest to grow in Spring and Fall. Here in York County, if the ground is bare (meaning there's no snow on the ground, if so you have to wait till it melts), then I'll put out a bit of seed on Saint Patricks Day (yes, in March) and then sow more seeds every few weeks until Mother's Day. Light frosts will not harm the seeds or seedlings. If you do get a hard frost (25 degrees F or less) then, just cover with some plastic for the night. 

Summer is difficult with lettuce because of the heat. Your best bet is to find "bolt resistant" varieties (it will say on the seed packet) and plant in partial shade. Bolting means the plant has gone to seed and will taste very bitter. 

For fall gardening, I start sowing lettuce seeds in Mid August and plant more out every few weeks till mid to late September. Eventually, the winter will be too much for the lettuce and it will go bad (it will be very limp in the garden) but you can extend the season with a simple cold frame or row cover. In August, be sure to not let your lettuce dry out. 

That's really all there is to it. Be sure to wash it thoroughly before eating. My salad spinner was only $10 at Walmart and works great. I've never had any pests or diseases on lettuce that made me even think about treating with pesticides. The occasional slug isn't hurting anything. Have you grown your own lettuce? Feel free to write about your experiences in the comments below!


Tuesday, November 30, 2021

Gift Ideas for the Gardener in Your Life

 It's that time of year again! I sincerely hope you are able to enjoy the holiday season and not get

My daughter holding a gift that sadly, isn't
garden related.

bogged down in obligations and stress. In writing a post on gift ideas, I realize I may be buying into the more materialistic side of Christmas but rest assured, I make no money whatsoever for writing this blog and there are no affiliate links. It is my belief that a thoughtful gift builds relationships and warms the heart. If you have a loved one who enjoys gardening, or even just has a yard to take care of, then this post is designed to get your creativity going. 

1. Gardening gloves. You can never have enough. They wear out and you need new ones. I find both the leather work gloves and the rubber tipped gloves handy for different tasks. 

2. Hand tools like a soil knife or hand pruners. Don't ever buy adults plastic tools. You can find good, steal hand tools at any hardware or home improvement store. 

3. Larger tools like a spade or leaf rake are harder to wrap but are just as necessary to anyone who has a yard. 

4. A gardening magazine subscription! I suggest going to a large bookstore and looking at their magazine section. Buy the one you like best and then fill out the subscription card to on behalf of your friend. 

5. In the same vein, we gardeners love books. There are gardening books on everything from preserving food to composting to growing wildflowers. I recommend anything by Monty Don. 

6. A good sun hat is very helpful for gardening. 

7. A lovely house plant can help us plant lovers get through the winter. 

8. Gift cards to local garden centers are fantastic. The last time someone gave me a gift card for that, I spent about half of it on mulch and soil and was happy to do so. 

9. There are a multitude of funny gardening t shirts out there from "Introverted but will talk about plants" to "Save the galaxy, plant a Groot." 

10. Interesting and rare seeds. Just be sure they will grow in the climate zone your friend lives in. I will say, I recommend Baker Creek Seeds for this. 

Contrary to what you might be thinking, this post is NOT to drop hints about what I want for Christmas. However, I hope it gives you some ideas. Are you into gardening? What do you want for Christmas?


Monday, September 6, 2021

The Importance of Thinning Seedlings

Pea seedlings before being thinned.
 One of the most unpopular gardening jobs has to be thinning seedlings. Sweet, sensitive souls don't want to hurt their babies. The seedlings look so good right now! Why kill perfectly good plants? I hate to break it to you but proper thinning is absolutely essential for garden success. For those of you who grow fall greens (and you should), now is a pertinent time to be thinning your seedlings. 

What do I mean by thinning? Well, when you plant seeds you almost always plant more than you need. There is no guarantee that all of your seeds will sprout into plants so you plant more than you need. Hence, you also end up with more seedlings (baby plants) than you need. Therefore, you must thin them out to the spacing recommended on the back of the seed packet. 

But Why?

First of all, plants cannot grow any further if there is literally no room to grow. Picture how big the plant will be at full size. Most seed packets will have that information listed. The diameter of a large carrot is over an inch thick but if you have six carrot seedlings per square inch, clearly there is no way any of them have space to get to a decent size. Vining plants like cucumbers and melons need several feet to spread so must be spaced even further. 

Pea seedlings after being thinned. 
Second, there are limited resources in any soil. No matter how good your garden soil is, it can only hold so much moisture or nutrients. If your plants are too close together, then they will be fighting for the same resources. Instead of a few healthy plants thriving, you have a mass of plants on starvation rations. This is even more true in the fall when sunlight is more scarce than the spring or summer. 

Finally, air circulation is absolutely essential to preventing mold and fungus on your plants. (Fungi thrive on moist conditions) but there can be no air circulation if your plants are jammed together. If you fail to thin your plants out than your just asking for mold on your plants. 

The good news is, thinning is easy to do. Also, seedlings like spinach and kale can be replanted (carefully! don't let them dry out till established!) so they won't go to waste. You just can't do that with carrots because the roots will be messed up. 

Good luck with your garden!


Thursday, August 26, 2021

What to do in your garden in late August

It's Sunflower Season!
 One of the most frustrating things about writing a gardening blog is that the time of year people are most interested (summer) is the time your are most busy with what you're writing about (gardens). It's also the time of year when my lovely daughter is home from school so I'm looking after her. She likes to help in the garden for a few minutes at a time. Maybe when she's older. 

I didn't mention seed saving but now's the time for that.
Green bean seeds, like these, are a great place to start. 
Anyways, now that she's back in school I have more time to write and I thought now would be a great time to update you all on my garden and what you can be doing in yours. After the awful cicada apocalypse, it  ended up being an awesome year for vegetables. Spring veggies were delicious and prolific. I've had more tomatoes, zucchini, green beans and melons than I know what to do with. So it's been a great year for my neighbors too. I think one of the leading reasons for this is my soil. My ground soil is terrible but my raised beds have been established for a few years now so the more organic matter I keep adding, the better the quality. I also invented a new fertilizer mix that I might share some time. 

How about you? We've had lots of rain this august so if you've got a lot of fungus in your garden, it's no wonder. You can find more information about dealing with that here.  If your plant is no longer producing fruit and is covered in fungus, then remove the whole plant from your garden. Unfortunately, unless you are a composting expert who keeps track of compost temperatures, then you shouldn't compost your diseased plants as the fungus will linger and spread. I throw them out in the trash. If you've gotten a decent harvest from a plant already, then don't feel bad about loosing the plant. All plants die eventually, it's just part of the garden. Clearing out the plant can make room for new things...

It's also canning season which is not my favorite gardening 
task but I do love the canned goods later!
This leads me to the next thing you can do which is plant fall leafy greens. It's probably too late for carrots or peas but you can still start lettuce, spinach, and kale from seeds and have delicious greens for the rest of the year! Just keep the seeds well watered in this hot weather. 

As the garden starts to wind down, it's also  a good time to plant cover crops. This is my first year trying this out and I'm planting crimson clover. It's a legume that should add nitrogen to the soil. When it starts to flower, I just weed whack the tops off and the plant will die down on the soil creating a natural mulch to keep weeds down and add organic matter. I'll update you all on that later. 

Finally, if you can't stay on top of the weeding, at least snap off the seed heads of the weeds to help prevent spreading. Your future self will thank you. I'd love to hear updates from your garden in the comments below!


Thursday, January 21, 2021

Grow Your Own Bouquets Part 1


Everyone loves flowers. Currently, it's January and I'm starved for their freshness and color. However, florist flowers can be pricey and most people can't afford to keep them on their table all the time. Growing your own bouquets is completely doable for even a beginner gardener assuming you have some yard and sunshine to work with. This is the first of 3 posts on how not just to grow flowers, but how to grow bouquets. We'll start with how to get started. 

First, choosing a good sight is the most important thing you can do to ensure gardening success. Many shortcomings can be over come but you MUST have lots of sun and soil must not be too water logged. Almost all annual flowers you can grow for a cutting garden will require at least 6 hours of sunlight per day in the summer. It's also essential you don't plant in a low depression where water collects as it will cause root rot. 

Second, get an idea of what kind of soil you have. You can either 1) get a highly detailed report from your local extension office for a nominal fee. OR 2) buy a DIY soil test and get an idea of what nutrients your garden needs and it's PH level. OR 3) You can make some general observations about your plants and dirt to give you clues of what you're dealing with. (What plants are already happy? What grows well in your neighbors yard? What color is your dirt? How loose is it?) I'm going to strongly recommend doing option 3 in addition to option 1 or 2. 

Third, if you can, locate your garden near a source of water. You'll be thankful in July and August when it's dry and your garden needs supplemental watering. 

Finally, when you're selecting varieties, be careful to plant flowers that will reach at least 24 inches tall. There are beautiful dwarf zinnias and marigolds but the stem length doesn't lend itself to cut flowers. 

You can find seeds in a multitude of catalogs or at any garden center in the spring. With a small investment and a little work, you can keep beautiful flowers on your table for months and also bless your friends and family. Stay tuned for the next two posts for plant ideas!

Thursday, January 7, 2021

Order Your Seeds!

 About a week before Christmas, a good friend of mine asked if she should order her seeds then or wait till the new year. I told her that I always wait until January and it's fine. As with so many things to due with Covid 19, I clearly underestimated it's ability to influence gardening. Between so many new people getting into gardening (which is awesome) to all the people panicking and hoarding seeds (which isn't) many seed companies are having a hard time with keeping things in stock and getting orders filled in a timely manner. Add to this a postal service which is still behind from Christmas (so seed catalogs are arriving later than usual and seed orders placed via the mail are getting there late too) and things are a bit rocky. 


So, here's my 2 cents on the situation. 

First, figure out what you want to grow this year. Then look at the seeds you have left over from the last few years to discern what your are lacking. 

Second, place your order as soon as possible. 

Third, place your order online and not via snail mail. Yeah, I know most people do this anyways but if your an old soul who enjoys using stamps, just make an exception this once. 

Fourth, there is no need to hoard seeds. Seeds are really only good for up to 3 years or so depending on the variety and how well you store them. If you order more than that, it's going to waste. 

Finally, my guess is that beginners will still find plenty of seeds and plants at their local nurseries this spring to choose from. It's only those of us who enjoy specific varieties that need to get a move on. But again, I've been wrong before. 

Here are some great websites for ordering seeds. (None of them are paying me money)

Territorial Seed Company

Johnny's Seeds

Seed Savers Exchange

Baker Creek Heirloom Seeds

How do you get your seeds and plants? Have you had any problems this winter? Feel free to write about your experience below. 

Sunday, September 13, 2020

Seed Saving for Newbies

 Starting with a bit of honesty here, I'm not the expert on seed saving. There are folks out there who've been doing this for decades with all kinds of success and variety. That's not me. Yet. However, if you're wondering about maybe trying a little yourself, I can share with you some good ways to get started. 

Why should you save seeds? I partly do it as an activity with my daughter Hannah. It's a good educational project to learn about plant biology. I partly also do it to save money. Saved seeds means I don't have to buy more next year. Finally, if you do this over time, the plants will actually start to acclimate to your specific climate and soil conditions making them perfect for you. I haven't been doing it long enough to enjoy the last benefit but we'll get there. 

Please note that all seed saving is best done with heirloom plants. It has to do with how long that variety has been around. Seeds from hybrid plants will probably germinate for you but the flower or fruit may not look like what you expect. You can tell if an plant is heirloom (or open pollinated) from the seed packet you originally bought. 

My excursions into seed saving have centered around vegetables and flowers. First, if you've grown


peas or beans this year and the plants are still out there in the garden somewhere, then you might have some great seeds outside waiting for you. Just look for any old, dried pods that you didn't get around to pick. Open the pods up and separate out the seeds inside (see picture). 

With flowers, I enjoy saving zinnia and marigold seeds the most although my daughter is saving 4 o'clock seeds this year too. Leave a few flowers on the plant until they turn brown and dry and then pluck off the heads. You'll find the seeds under where the petals used to be (see the other picture). 


When storing seeds, note that moisture is your worst enemy. I keep the seeds out on trays till they are 100 percent dry and then store them in a sealed jar in the basement. Next spring I'll be ready to go. If you're interested in more information on this subject, I"ll include some links below. Do you do seed saving? I'd love to hear about it in the comments below. 


A Garden Guide to Save Seeds

How To Save Seeds

Saturday, August 29, 2020

Growing Squash Successfully

 It's currently late August as I write this so a lot of this information should be filed under "things to try next year". However, I've been trying out several new things with squash this year and I want to share while it's still fresh. Squash are just so delicious I can't imagine not growing them. So here are a few basics and some tricks and tips to help you enjoy your squash. 

First off, there are basically two kinds of squash: summer and winter. Summer squash grows very quickly and has a thin skin like zucchini, pattapan, and yellow squash. Winter squash grows slowly and has a  thick skin like butternut and acorn squash. The growing tips I give you will be true for both unless I specify otherwise. 

If you've never grown squash before, I recommend buying seedlings from a near by garden center. They can be planted out as soon as all danger from frost has passed. No squash plant will tolerate frost. Squash need at LEAST 6 hours of sun a day and regular watering. Giving your squash plants great growing conditions will create stronger plants that can fight of pests and diseases much more effectively. It will also mean more and better quality fruit. 

One of the biggest problems I've had with squash are squash vine borers. A little moth lays an egg at the base of the squash vine and it hatches. The little grub eats into the vine and pigs out till the vine dies. If you're not paying attention the plant looks great until one morning when it has totally wilted. At that point, its too late. Last year I lost every single squash vine I had (including pumpkins!) to this pest. So, this year I tried a few different things. I wrapped aluminum foil around the base of the vines so the grubs couldn't bore into the vines. I periodically sprinkled diatomaceous earth around the base of the plant to repel the grubs. I also kept an eye out for the holes near the bottom of the plant and poked a wire up into the plant to kill any grub inside. These steps worked wonders. I only lost one plant to grubs this year. Yahoo!


Another big problem is fungus, like powdery mildew. Here in central PA, it's humid enough that fungus is just inevitable but I try to fight it off as long as I can. Some great ways to do that include: 1) When watering squash, don't get the leaves wet, just the ground. water creates a moist environment where mold and fungus thrive. 2)Selectively trimming out leaves as they yellow to keep it clean and allow more air circulation. 3) Look for mildew resistant varieties at the garden center. and 4)Use an organic anti fungal spray as needed. I use Green Cure. No spray can get rid of fungus already there but it can help prevent the spread of it. 

When growing summer squash, I learned this year that you can plant it much later than I thought and still get  a great harvest. I planted zucchini seeds on June 30 and by August 10th I was harvesting fruit. Also, because it was planted later, it never got hit with quash vine borers and it still doesn't have mold on it. I haven't treated it with anything. This also helps with succession planting and you can wait till your spring crops are done and then plant summer squash. Just remember that winter squash takes a lot longer to grow so you can't wait to plant that. 

Whew! It's been a busy year for squash but I just love it. Do you have any tips for growing squash? Feel free to post in the comments below!

Healthy Zucchini Plants
Powdery Mildew on Zunnias


Friday, August 7, 2020

Fall Gardening Part 1 - Edibles

I do love Fall


One bright side of the whole pandemic has been a surge in people wanting to grow their own food. If you haven't gotten on the bandwagon yet, or even if you have, it's not too late to plant more food for this years harvest. You might be surprised to learn that several kinds of vegetables actually prefer cooler weather and fall is a great time of year to grow them. 

Of course, the timing of planting depends on where you live. The farther north you are, the sooner a hard frost will come and put an end to your growing season. I live in south central Pennsylvania on the line between zone 6b and 7a. You can learn more about climate zone here

Carrots and peas can take a while to germinate so I planted my seeds last week. Carrots cannot be transplanted and peas are so easy to grow from seed that you don't need to buy plants. Lettuce, spinach and kale grow quicker so I've planted a little but I can plant them here up until Labor Day. Some vegetables, like broccoli and cauliflower, take so long to grow that you're really better off buying plants at your local garden center and planting them soon. Beets and radishes are also great to start from seeds now. 

The trick of fall gardening is that the plants don't like heat but you have to plant them in summer so they'll germinate and have enough time to grow. This means at least daily watering. It's a hassle, to be sure, but every October when I can still go outside and pick fresh produce I'm always so glad I planted more veggies ahead of time. It's also really important to keep the veggies clear of weeds and properly thinned out because sunlight will be more scarce in the fall and your plants will not due well with competition. 

Add caption

Do you practice gardening in fall? What are your tips and tricks? Feel free to post in the comments below. 

Thursday, April 23, 2020

Planting Seeds 101

So, it's one of my favorite times of the year, planting time! Actually, I start planting onions sets in mid March and keep planting stuff till tulip bulbs in November. But Early May is the time to plant lots of stuff! Before you go and start your garden this year, be sure to review some basics so you'll be off to a good start.

First off, a few definitions. If you hear the term "direct sowing" it means sowing seeds directly into the ground outside. That's what this post is all about. "Seed starting" usually means sowing seeds indoors to give them a head start. That's not what this post is about.

Secondly, you must prepare the soil before planting. Do not skip this or you'll regret it! You've got to be sure the soil is weed free ahead of time, and also pick out any rocks. You'll also want to break up the top two inches of soil so it's loose and easy for seeds to spread their roots. It also never hurts to add some soil enrichment's like compost, composted cow manure or mushroom soil. The better your quality of soil, the better your plants will be.

Third, when you go to plant your seeds, be sure to read the package directions. As a general rule, the larger the seed, the deeper it goes. However, it's always best to read the package. Small seeds like radish and lettuce can just be sprinkled on top of the soil and larger seeds like beans go a few inches down.

Fourth, always water after you plant unless it's about to rain. It's very important that you keep the top few inches of soil moist at all times for the first few weeks to keep the baby plants watered. Once the seedlings are about 4 inches tall, you can lay off a bit.

Finally, if you're planting what's called a "heavy feeder" (a plant that needs A LOT of nutrients to grow well) like corn, tomatoes or melons, then consider giving it an extra sprinkle of organic fertilizer to give it a great start. I like Espoma brand because it's easy to find in the stores and works for just about any plant.


That's really all there is to it. Even children can plant seeds. So don't be intimidated! You can grow a garden too.

Saturday, July 13, 2019

Why Bare Ground Is Bad for Your Garden

Even after years of gardening growing up, one thing that I never realized was bad for the garden was bare ground. What do I mean? When you clear all the weeds and plants in a section of garden and then leave it empty so you can see the bare ground.  Mind you, my hard, clay soil makes this abundantly obvious when it develops deep cracks as it dries out but even if you have great soil, it's still not good to leave it bare - especially in the summer heat. Here's why.


1. Erosion: Any soil amendments and fertilizer you've put on your garden bed are likely to wash away in a summer downpour.

2. Heat: Bare ground heats up quickly which repels garden helpers like worms and other beneficial microbes.

3. Compaction: Bare ground will bake and get really hard so when you do want to plant something, it will be very difficult. This is especially true if you have clay soil like I do.

So what should you do instead? You can help your soil by covering it up in one of the following ways:

1. Mulch: Put any kind of non-treated organic matter and dump it on your empty space of ground until you are wanting to use it again. Anything from straw and grass clippings to pulled weeds. Seriously, I've temporarily got a pile of dead pea plants piled up in a part of my garden where I plan on planting fall crops in another month. Couldn't be easier or cheaper.

2. Cover Crops: These are plants like clover or buck wheat that help build your soil and keep it cool and covered while you're not using it. You can find seeds for this at most garden centers.

3. Let the weeds go: The caveat here is that you cant' let them go so long they go to seed and get out of hand. Even then, it's still probably better to leave some weeds than to let your ground go completely bare for long.

Keep in mind that nature abhors a vacuum. The only time you see bare ground in nature is in a dessert and we certainly don't want our gardens to resemble that. So do yourself a favor and keep your garden covered as much as you can and it will greatly improve your soil over time.

Wednesday, May 15, 2019

An Update from My Yard

It's been some time since I've updated this blog with projects going on in my own backyard. As you might suppose for mid-May, it's been busy with lots going on. In the hopes it might inspire you in your garden endeavors, here's what I've been up to.

This past winter I spent probably too much time watching Monty Don videos on Youtube as he visited famous gardens all over the world. Consequently, I've decided to turn my vegetable garden into a French Potager. It's basically a productive garden with veggies, fruit, herbs and flowers that is also beautiful to look at. There's so much more to it than that but it'll have to be its own post.

It took a lot of effort but I finally got a large perennial bed put in on the east side of my house. Initially, I wanted to create a permaculture forest garden but it's not working out that way. It's very difficult to find plants that will tolerate wet, clay soil in partial shade. When I get this bed completely done, I'm going to share how I did it as a public service because it's not easy.

My strawberry plants and raspberry plants are looking awesome. If you're interested in growing strawberries of your own, check out this post. 

Because I planted garlic and perennial onions last October, they are looking fantastic now. I'm looking forward to harvesting them in July.

I was able to get all my veggies in but I'm still having trouble with my cucumbers and watermelon not sprouting. Don't feel bad if some of your seeds don't sprout - it happens to all of us. All you can do is follow the instructions on the packet and wait.

Now is a great time to plant all kinds of summer veggies and flowers. Get out this weekend and enjoy your garden!

Thursday, February 28, 2019

Grow Outside of Your Comfort Zone!

Generally speaking, its always a good idea to try out a few new plants each year. Its super fun to experiment and you might discover something awesome that you can't live without. However, this year I've gone a little bit overboard with new varieties and I'd love to share some with you. At the end I'll let you in on my sources.

Strawberry Spinach
Did you know you can buy spinach seeds that produce not only delicious leaves but also sweet berries? How cool is that? I've not grown them yet, but I'm going to this year and I'll let you know how they turn out.

Antique Flemish Poppy
Traditional poppies have never interested me as their flowers are simple and they make terrible cut flowers (they wilt quickly). However, some poppies have extra petals that make them prettier (to me) and a few types will produce culinary quality poppy seeds! If you're into baking you're probably aware of how expensive poppy seeds are at the store. Imagine getting to grow your own!

Lovage
This herb is rumored to taste just like celery and it's a perennial that is available this year. I have a bad history of throwing out celery before it's used up and this would be just awesome. Lovage doesn't have the same crunchy stems as celery but the leaves would be great for soup and casseroles.

Gherkins
Imagine if a cucumber and a cherry tomato had a baby - then you'd get gherkins. I've had one before at a friend's and it's delicious. If you like cucumbers then you should definitely try these.

Those are just a few of the new things I'm trying out this year. If you're interested in trying some you can find lots of great things from Baker Creek Heirloom Seeds (I don't get any money from them). Territory Seeds and Johnny Seeds are also trusted sources. For unusual fruit trees, look up Trees of Antiquity online (I only wish these places gave me money to mention them). If you're really brave, you can even find unusual plants on etsy but that's always a gamble.

Feeling inspired? Go out and try something new! It's also fun to do with kids. I love showing my daughter new plants and trying new foods. Feel free to post in the comments below on how you've grown out of your comfort zone!


Friday, March 9, 2018

Seed Starting With Kids

Generally speaking, I hate seed starting. It's a lot of work to do it well and requires a lot of special equipment, or at least a sun room. If you go through all of that successfully (meaning the seeds sprout) then you have to go through the process of hardening them off. What a pain! However, if you turn seed starting into a fun and educational project I can do with my daughter, then I'll consider it.
This year, I'd love to try "Red Cherry Marigolds" from Baker Creek Seeds in my front window boxes so I started them inside this week. If you too are blessed with special little helpers, then this is for you!

Heads up, this project will be really messy so plan accordingly.

Here is what you'll need:
>One or more cardboard egg carton (not Styrofoam)
>Potting soil
>Seeds
>Baking sheet or tray
>Small watering can

1. Let your helper fill the egg carton half full of soil. (I found it was easier for her if I put the soil into a large bowl first.)
2. Have your helper sprinkle water over the soil to dampen it, then create a small hole in the center for the seeds.


3. Put one or two seeds in each hole. (I let my helper do this but had to fix it when she put a lot of seeds in one hold and said they were having a party. She's three.)
4. Let your helper finish filling the egg carton with soil and water more.
5. Place egg cartons on tray and place in a sunny window.


Like I said, we used marigolds for this but other great seeds for little ones (because of the larger size of seed and ease of germination) include sunflowers, zinnias, bachelor buttons, green beans, peas, and corn. About the beginning of May, you can plant the seedlings outside by just separating the different sections of egg carton with scissors. The card board can be planted and will disintegrate over time.

Have you ever done seed starting with kids? Be sure to post about it in the comments below. 

Monday, January 29, 2018

The Basics of Winter Sowing

This topic is rather exciting for me because I think it will be so useful for many of my friends. Most of the people I hang out with don't have a lot of time and energy to put into gardening, enjoy doing projects with their kids, and would like to save a few bucks. Winter sowing, in theory at least, can accomplish all three of these things.

Having somewhat limited space with a baby, a cat, and a toddler (I have a husband too but he would leave my plants alone) makes seed starting an impossibility. Also, the cost of special lights, trays, soil, warming pads and any other equipment makes seed starting way more costly than just buying plants at the nursery in the spring. However, if you can do direct seeding outside then it's much cheaper than buying plants. Winter sowing is a way to put these methods together.

Here are the basic steps.
1. Get a few plastic jugs such as milk cartons and cut three sides of the container so you can "hinge" it open at 3-4 inches from the bottom. You MUST put holes in the bottom for drainage. Otherwise your seeds are toast.

2. Fill the bottom 3 inches or so with soil. I used Miracle Grow Seed Starting Potting Soil because that's what I had on hand. You can use any decent potting soil. (One website I read suggested peeing on dirt to add nitrogen. You can try that and let me know how it goes.)

3. Thoroughly water the soil and let it drain a bit. Then plant 3-6 seeds in the soil and be sure they are covered.

4. Duct tape the container back together and leave the cap off for ventilation.


5. Set the containers outside in the sun. Don't heat them or protect them. Do this soon, after February it will be too late.

6. Forget about them! Let nature take it's course till the plant is big enough in the spring to be transplanted.

Pretty easy huh? Winter sowing is also a great project to do with your kids. If it works well this year, then this will definitely become part of my new gardening routine. Have you tried winter sowing? Please post about it in the comments below!